RS3 Desperate Times Quest Guide
Desperate times quest is the continuation of the Elder Gods quest series, where the player encounters Jas during Sliske’s Endgame. The quest was initially introduced in the mid of 2019, and due to the quest being long, we’ve decided to provide a simpler version for you. In the following guide, you will learn how to complete the quest, as well as the requirements needed during your journey.
Looking For Cheap OSRS Gold And RS3 Gold? Please Go To RSOrder.com!
Quest Requirements
You will the following skill requirements; 50 Mining, 50 Smithing, 50 Divination, along with items; Rune Bars x3, Runite Stone Spirits x2, Mind Runes x10, Gleaming Energy x10, Necklace of Charos or an Old Necklace, and Skull of Remembrance or equipment to enter the Black Knights’ Fortress. Other than that, having the Fairy Ring access would be a good addition, along with Varrock and Phenix Lair Teleports and a Dig Site Pendant.
How to begin?
To start this quest, you must first head to the first floor of the Burthorpe Castle to speak to Seren. She will invite you to join her council and bring it to highlight that Gielinor is basically regarded as a food source for the Elder Gods’ unborn offspring. The primary goal of the council is to prove that their lives are worth something more and that they shouldn’t be treated as a source of food. They plan to take an appeal to the Elder Gods. The first God that they’ll be visiting is Bik, and they have it planned that they are going to impress them by building a garden. Once the information is clear, discuss where you’ll find a suitable location to build one, along with the seeds and team allotted to you.
Location, Team, and Seeds
First thing first, you need to sort out the land issue by speaking to Zarador to use the Feldip Hunting Grounds. You can also choose to ask Vanescula Draken or Osman for the Morytania Swamps or the Northern Desert, respectively. Now, what you’ll need is a team (task force), which you can get by speaking to Brundt the Chieftain, Sir Amik, or Mola for Fremenniks, White Knights, or Undead Forces, respectively. Finally, what’s left are the seeds, which can be obtained by speaking to either Azzanadra, King Roald, or Garlandia. It doesn’t matter what options you choose, because the council will deny the request at the very end.
The denying will continue for three combinations until the appearance of Kerapac triggers, who will state that the plan is not going to work out while offering an alternate plan. The plan is about permanently destroying the Elder Gods with the help of the Elder Artefacts. Everyone but Seren will agree with the plan, and that’s when Thok will state that he’ll do his part by scaring the Gods away. After hearing that, Kerapac will send you and Thok off to The Needle, which is a Fishing Colony found west of the Piscatoris.
The Needle
Once you’ve reached the Needle, speak with Kerapac and he’ll ask whether you can feel the Artefact’s power or not. Whatever option you choose, he will state that he can’t charge the Needle without causing worldly instabilities to appear. There will be fixed in total; one near the Needle, two in the front yard, and two on the 2nd floor. Close each one of them and speak to Kerapac again to know that the Elder Artefact has a form of consciousness and to advance any further he will need the help of a mage called Charos.

Keeping that in mind, go to Charo’s Tomb, which is located beneath the McGrubor’s Woods. You can either use a home teleport to reach the Seer’s Village Lodestone (nearby), or the Fairy Ring (south-east after teleporting to reach the strange hole). Within the tomb, you will receive a letter from Charos, which states that he knows what you’re up to, and in order to find him, you will have to play a little game. The game revolves around finding three different keys by solving various riddles. These keys will be used to power up Charos’ Old Necklace and remove his old disguise.
Key Locations
First Key

Head to the Varrock Dig Site to notice that there is a group gathered around a strange portal. Step inside it and you will come across a room with a puzzle in the middle of it. This puzzle will lead to a number of other rooms, and to beat it, you must go through the doors that lead to chests. These doors can be unlocked by standing on the magic portals. Since there is no particular combination, the simplest way would be to try out each color of the portal until the door you want to open has unlocked. Once that’s done, move towards the chest and you’ll notice that there is a riddle that needs to be solved. If you’ve properly solved it, then you’ll receive a four-letter code that needs to be entered into the lock’s combination to open the chest. You can check the various combinations on the official website because it is random for every player.

After unlocking the chest, a part of a word grid will be revealed, which is actually the solution to a sliding puzzle. Similarly, unlock each and every one of the chests to complete the word grid and solve the slider. When you get to the grid part, you need to solve it in a similar manner as the Treasure Trails Puzzle Boxes or the Dungeoneering Tile Puzzles. Once you’ve successfully solved it, you will obtain a key, which will automatically combine with the key and a portal that leads to the outside will suddenly appear.
Second & Third Key

Similarly, there will be two other locations. The first is the bedroom on the second floor of the Varrock Palace, right behind the clothing screen. The second location is the first floor of the Black Knights’ Fortress, within the southeastern room that is nearby the entrance. Once you solve both the slider puzzles and have obtained the final key (third key), you will receive a Bloody Clue Scroll with the word URIT written on it. So, you will now need to head towards the Varrock Place Library.
The library
You will now need to speak to Reldo in the next stage of the desperate times RuneScape quest, who is located in the Varrock Palace Library. Once you do, you will be able to use the necklace, which will also trigger the appearance of Charos (who was Reldo in disguise), and along with that Kerapac and Thok will join you to discuss the further plans on what needs to be done with the Needle. Kerapac will allow Charos to create a device that will help him stop the Needle, and Thok will be sent by Charos to adopt his own method. Now, Charos will be in need of three items; Rune Bars x3, Runite Stone Spirits x2, Gleaming Energy x10, and Mind Runes x10, to build the device. Once you hand him the items, he will create the device and ask you to meet him at the Needle.
The Device
When Charos reaches out to use the device on the Needle, he and Thok will be attacked by Gail in the Runescape desperate times quest. Kerapac will then think of a strategy to distract Gail, while you make your way into the Needle. Now, entering it will take you too deep into the Guthix’s Cave, and that’s where you have to beat Sliske’s clones and collect broken mask shards from them. The spawn will trigger as you walk across the cave, so make sure that you properly explore it for them to appear. After defeating five of the clones, the shards will combine to make Sliske’s Mask, which needs to be worn by you to become Sliske himself. You must now go to the end of the cave and kill the God Guthix, and right after that, you will be sent to Naragun.

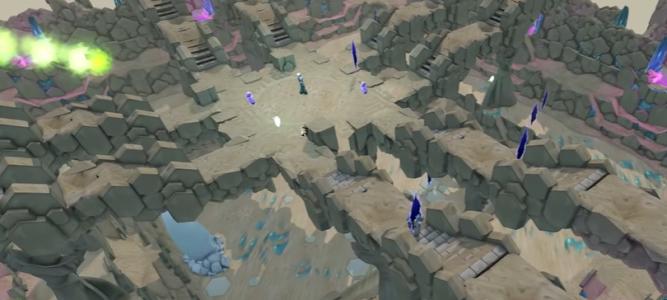
In this place, you will need to find the memories of Armadyl, Bandos, Saradomin, Zamorak, and Seren. You can then find Guthix near the Fairy Ring, so speak to him to get teleported to his cave. Once you’re inside, switch every mutable anime once to find four switches; 2 on the top and 2 at the bottom. If you’ve done it correctly, the light orbs should cross paths with each other twice, once on the upper and once on the lower level. You will notice that Sliske isn’t appearing in the middle platform and speaking to you about the Gods. From there, head west into the room with Gielinor and use the Agility shortcut (southeastern corner with the smoke bombs) to make your way around the room.
Attract with the white fish wish-looking window and then make your way over the planks, down the cliff, up the fish window on the southwestern side and climb right in. Once you climb through the obstacles near the storage creates, you will be able to use the door to the north to exit the area. Make it to the very end and jump down to reach a new area, which is the upper platform of Sliske’s Labyrinth of the desperate times rs3 quest.
Final Moments
The upper platform of the RuneScape desperate times quest is where anima will now be able to enter temporal portals. You can also enter the portals to reach different rooms, and to advance further, you must redirect the anima that reached Kerapac. The four mutable animals are; two on the middle level, one on the ground, and one on the top.

Now, the final room of the desperate times rs3 quest will appear which is the end area of the Dragonkin Laboratory. There will be a few orange-colored and frozen nodes in the area, which need to be unfrozen by finding memory wisps. There’s one in the northeastern room, one in the southeastern (where Verak Little would appear), and one in the western staircases (where Black Stone Dragon would appear). Once you’ve redirected the energy to Kerapac instead of Gail, a cutscene will trigger Kerapac to gain complete control over the Needle by stabbing it with the Armadyl Staff. Due to the device, Kerapac will be able to retain his memories and Gail will return to her human form (Primrose).
Once the cutscene ends, speak to Charos who will be filled with frustration, and Primrose will state that she needs to meet her mother. That’s when you have to head back to the council and inform Seren about the occurring events. This will be the end of the desperate times RuneScape quest.